Category: Partners

The ABC’s of Splunk Part Three: Storage, Indexes, and Buckets

Jul 28, 2020 by Sam Taylor

In our previous two blogs, we discussed whether to build a clustered or single Splunk environment and how to properly secure a Splunk installation using a Splunk user.

Read our first blog here

Read our second blog here

For this blog, we will discuss the art of Managing Storage with indexes.conf

In my experience, it’s easy to create and start using a large Splunk environment, until you see storage on your Splunk indexers getting full. What would you do? You start reading about it and you get information about indexes and buckets but you really don’t know what those are. Let’s find out

What is an Index?

Indexes are a logical collection of data. On disk, index data is stored in different buckets

What are Buckets?

Buckets are sets of directories that contain  _raw data (logs), and indexes that point to the raw data organized by age 
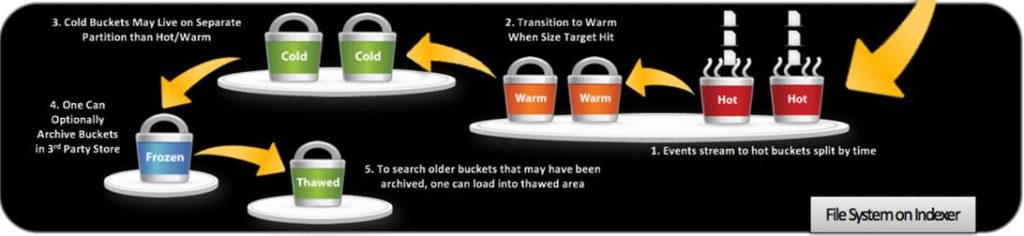
Types of Buckets:

There are 4 types of buckets in the Splunk based on the Age of the data

  1. Hot Bucket
    1. Location – homePath (default – $SPLUNK_DB//db)
    2. Age – New events come to these buckets
    3. Searchable – Yes
  2. Warm Buckets
    1. Location – homePath (default – $SPLUNK_DB//db)
    2. Age – Hot buckets will be moved to Warm buckets based on multiple policies of Splunk
    3. Searchable – Yes
  1. Cold Bucket
    1. Location – coldPath (default – $SPLUNK_DB//cold)
    2. Age – warm buckets will be moved to Cold buckets based on multiple policies of Splunk
    3. Searchable – Yes
  1. Frozen Bucket (Archived)
    1. Location – coldToFrozenDir (default – $SPLUNK_DB//cold
    2. Age – Cold buckets can be optionally archived. Archived data are called to be Frozen buckets.
    3. Searchable – No
  1. Thawed Bucket Location
    1. Location – thawedPath (no default)
    2. Age – Splunk does not put any data here. This is the location where archived (frozen) data can be unarchived -we will be covering this topic at a later date
    3. Searchable – Yes
Manage Storage and Buckets

I always like to include the reference materials from which the blog is based upon and the link below has all the different parameters that can be altered whether they should or not. It’s a long read but necessary if you intend to become an expert on Splunk 

https://docs.splunk.com/Documentation/Splunk/8.0.5/Admin/Indexesconf

Continuing with the blog:

Index level settings
  • homePath
    • Path where hot and warm buckets live
    • Default – $SPLUNK_DB//db
    • MyView – As data in Warm and hot bucket are latest and that’s what mostly is being searched. Keep it in a faster storage to get better search performance.
  • coldPath
    • Path where cold buckets are stored
    • Default – $SPLUNK_DB//colddb
    • MyView – As Splunk will move data from the warm bucket to here, slower storage can be used as long as you don’t have searches that span long periods > 2 months
  • thawedPath
    • Path where you can unarchive the data when needed
    • Volume reference does not work with this parameter
    • Default – $SPLUNK_DB//thaweddb
  • maxTotalDataSizeMB
    • The maximum size of an index, in megabytes.
    • Default – 500000
    • MyView – When I started working with Splunk, I left this field as-is for all indexes. Later on, I realized that the decision was ill-advised because the total number of indexes multiplied by the individual size, far exceeded my allocated disk space. If you can estimate the data size in any way, do it at this stage and save yourself the headache 
  • repFactor = 0|auto
    • Valid only for indexer cluster peer nodes.
    • Determines whether an index gets replicated.
    • Default – 0
    • MyView – when creating indexes (on a cluster), set the repFactor = auto so that if you change your mind down the line and decide to increase your resiliency. You can simply edit from the GUI and the change will apply to all your indexes without making manual changes to each one 


And now for the main point of this blog: How do I control the size of the buckets in my tenancy?

Option 1: Control how buckets migrate between hot to warm to cold

Hot to Warm (Limiting Bucket’s Size)

  • maxDataSize = |auto|auto_high_volume
    • The maximum size, in megabytes, that a hot bucket can reach before splunk
    • Triggers a roll to warm.
    • auto – 750MB
    • auto_high_volume – 10GB
    • Default – auto
    • MyView – Do not change it.
  • maxHotSpanSecs
    • Upper bound of timespan of hot/warm buckets, in seconds. Maximum timespan of any bucket can have.
    • This is an advanced setting that should be set with care and understanding of the characteristics of your data.
    • Default – 7776000 (90 days)
    • MyView – Do not increase this value.
  • maxHotBuckets
    • Maximum number of hot buckets that can exist per index.
    • Default – 3
    • MyView – Do not change this.

Warm to Cold

  • homePath.maxDataSizeMB
    • Specifies the maximum size of ‘homePath’ (which contains hot and warm buckets).
    • If this size is exceeded, splunk moves buckets with the oldest value of latest time (for a given bucket) into the cold DB until homePath is below the maximum size.
    • If you set this setting to 0, or do not set it, splunk does not constrain the size of ‘homePath’.
    • Default – 0
  • maxWarmDBCount
    • The maximum number of warm buckets.
    • Default – 300
    • MyView – Set this parameter with care as the number of buckets is very arbitrary based on a number of factors.

Cold to Frozen

When to move the buckets?
  • frozenTimePeriodInSecs [Post this time, the data will be deleted]
    • The number of seconds after which indexed data rolls to frozen.
    • Default – 188697600 (6 years)
    • MyView – If you do not want to archive the data, set this parameter to time for which you want to keep your data. After that Splunk will delete the data.
  • coldPath.maxDataSizeMB
    • Specifies the maximum size of ‘coldPath’ (which contains cold buckets).
    • If this size is exceeded, splunk freezes buckets with the oldest value of the latest time (for a given bucket) until coldPath is below the maximum size.
    • If you set this setting to 0, or do not set it, splunk does not constrain the size of ‘coldPath’.
    • Default – 0
What to do when freezing the buckets?
  • Delete the data
    • Default setting for Splunk
  • Archive the data
    • Please note – If you archive the data, Splunk will not delete the data automatically, you have to do it manually.
    • coldToFrozenDir
      • Archive the data into some other directories
      • This data is not searchable
      • It cannot use volume reference.
    • coldToFrozenScript
      • Script that you can use to ask Splunk what to do to archive the data from cold storage
      • See indexes.conf.spec for more information

Option 2: Control the maximum volume size of your buckets

Volumes

There are only two important settings that you really need to care about.

  • path
    • Path on the disk
  • maxVolumeDataSizeMB
    • If set, this setting limits the total size of all databases that reside on this volume to the maximum size specified, in MB.  Note that this will act only on those indexes which reference this volume, not on the total size of the path set in the ‘path’ setting of this volume.
    • If the size is exceeded, splunk removes buckets with the oldest value of the latest time (for a given bucket) across all indexes in the volume, until the volume is below the maximum size. This is the trim operation. This can cause buckets to be chilled [moved to cold] directly from a hot DB, if those buckets happen to have the least value of latest-time (LT) across all indexes in the volume.
    • MyView – I would not recommend using this parameter if you are having multiple (small and large) indexes in the same volume because now, the size of the volume will decide when the data moves from the hot buckets to the cold buckets irrespective of how important and or fast you need it to be

The Scenario that led to this blog:

Issue

One of our clients has a clustered environment and the hot/warm paths were on SSD drives of limited size (1 TB per indexer) and the coldpath had a 3TB size per indexer. The ingestion rate was somewhere around 60 GB per day across 36+ indexes which resulted in the hot/warm volume to fill up before any normal migration process would occur. When we tried to research the problem and ask the experts, there was no consensus on the best method and I would summarize the answer as follows “It’s an art and different per environment. I.e. we don’t have any advice for you”

Resolution 

We initially started looking for an option to move data to cold storage when data reaches a certain age (time) limit. But there is no way to do that. (Reference – https://community.splunk.com/t5/Deployment-Architecture/How-to-move-the-data-to-colddb-after-30-days/m-p/508807#M17467)

So, then we had two options as mentioned in the Warm to Cold section.

  1. maxWarmDBCount
  2. homePath.maxDataSizeMB

The problem with the maxDataSizeMB setting is that it would impact all indexes which means that some are going to end up in the cold bucket although they are needed in the hot/warm bucket and are not taking space. So we went the warm bucket route because we knew that only three indexes seem to consume most of the storage.  We looked at those and found that they were containing 180+ warm buckets.

We reduced maxWarmDBCount to 40 for these large indexes only and the storage size for the hot and warm buckets normalized for the entire environment.

For our next blog, we will be discussing how to archive and unarchive data in Splunk


Written by Usama Houlila.

Any questions, comments, or feedback are appreciated! Leave a comment or send me an email to uhoulila@newtheme.jlizardo.com for any questions you might have.

If you wish to learn more, click the button below to schedule a free consultation with Usama Houlila.

The ABC’s of Splunk Part Two: How to Install Splunk on Linux

Jul 21, 2020 by Sam Taylor

 In the last blog, we discussed how to choose between a single or clustered environment. Read our first blog here!

Regardless of which one you choose, you must install Splunk using a user other than root to prevent the Splunk platform from being used in a security breach.

The following instructions have to be done in sequence:

Step 1: Create a Splunk user

We will first create a separate user for Splunk and add a group for that user.
groupadd splunk
useradd -d /opt/splunk -m -g splunk splunk


Step 2: Download and Extract Splunk

The easiest way to download Splunk on a Linux machine is with wget. To get the URL do the following:

  1. Go to https://www.splunk.com/en_us/download/splunk-enterprise.html
  2. Log in with your Splunk credential.
  3. Select to download the Linux .tgz file. This will download the latest version of Splunk. To download an older version click on the “Older Releases” link.
  4. Once you click download, it will start downloading Splunk on your browser. Stop downloading.
  5. On the newly opened page, you will see Link for useful tools from there select “Download via Command Line (wget)” to get the URL.
  6. Select and copy the full wget link.

Open a Linux ssh session and paste in /opt/ directory. This will download the Splunk tgz file.

Extract Splunk:

tar -xvzf

Step 3: Start Splunk

Make sure from this point onwards you always use Splunk user to do any activity in the backend related to Splunk.

Change ownership of the Splunk directory.
Chown -R splunk:splunk /opt/splunk

Change user to Splunk.
su splunk

Start Splunk
/opt/splunk/bin/splunk start –accept-license

It will ask you to enter the admin username and password.

Step 4: Enable Splunk boot start.

/opt/splunk/bin/splunk enable boot-start -user splunk

Step 5: Use Splunk

Open your browser and go to the URL below and you will be able to use Splunk.
http://<ip-or-host-of-your-linux-machine>:8000/

Use the username and password you entered in step-3 while starting Splunk.

Click here for a reference

Written by Usama Houlila.

Any questions, comments, or feedback are appreciated! Leave a comment or send me an email to uhoulila@newtheme.jlizardo.com for any questions you might have.
If you wish to learn more, click the button below to schedule a free consultation with Usama Houlila.

The ABC’s of Splunk Part One: What deployment to Choose

Jul 15, 2020 by Sam Taylor

When I first started working with Splunk, I really didn’t understand the nuanced differences between a Clustered environment and a standalone other than the fact that one is much more complex and powerful than the other. In this blog, I’m going to share my experience of the factors that need to be considered and what I learned throughout the process. 

Let’s start with the easy stuff:
  1. Do you intend to run Enterprise Security? If you are, clustered is the way to go unless you are a very small shop (less than 10GB/day of ingestion)

  2. How many log messages, systems, and feeds will you configure? If you intend to receive in excess of 50GB/day of logs, you will need a clustered environment. You can potentially get away with a standalone but your decision will most likely change to a clustered environment over time as your system matures and adds the necessary alerts and searches

Now, moving on to the harder items:
  • How about if I’m receiving less than 50GB/day: In this scenario, it will depend primarily on the following factors:

    • Number of Users: Splunk allocates 1 CPU core for each search being executed. Increasing the number of users will also increase the number of searches in your deployment. On average, If <10, then standalone, otherwise clustered

    • Scheduled Saved-searches, Reports, and Alerts:  How many alerts do you intend to configure, and how frequently will they run the searches? If less than 30, then a standalone will work, but more will require a clustered environment especially if the alerts/searches are running every 5 minutes

    • How many  cloud tenancies are you going to be pulling logs from AWS, O365, GSuite, Sophos, and others collect lots of logs and if you have more than 5 of these to pull logs from, I would choose a clustered environment over a standalone (the larger your user environment, the more logs you will be collecting from your cloud tenancies)

    • How many systems are you pulling the logs from? If you have in excess of 70 systems, I would choose a clustered environment over standalone

    • Finally, Is your organization going to grow? I assume you know the drill here

A recent “how-to” question came from a Splunk user that is pertinent to this blog ”What if I want to build a standalone server because the complexity of the clustered environment is beyond my abilities, and my deployment based on the items above marginally requires a clustered environment, is there something I can do?”

The simple answer is yes, there are two things that will make a standalone environment work in this scenario:

  1. Add more memory and CPUs which you can always do after the fact: (look at the specs of the standalone server at the bottom of the document)

  2. Add a heavy forwarder: Heavy forwarders can handle the initial incoming traffic to your Splunk from all the different feeds and cloud tenancies which will help the Splunk platform dedicate the resources to acceleration, searches, dashboards, alerts/reports, etc.

Finally, it’s important to note that a clustered environment has a replication factor that can be used to recover data in case a single indexer fails and or the data on it is lost

Important Note when using Distributed Architecture:

Network latency plays an important role in a distributed/clustered environment, therefore, minimal network latency between your indexers and search heads will ensure optimal performance.

Hardware Requirements

Standalone Environment (Single Instance)

Splunk Recommended Hardware Configuration
  • Intel x86 64-bit chip architecture

  • 12 CPU cores at 2Ghz or greater speed per core

  • 12GB RAM

  • Standard 64-bit Linux or Windows distribution

  • Storage Requirement – Calculate Storage Requirement

View Reference Here

Standalone Environment with a separate Heavy Forwarder

Hardware Configuration
  • Same as Standalone hardware requirement for both the Standalone Instance and the Heavy Forwarder, however, the heavy forwarder does not store data and therefore you can get away with a 50 or 100 GB drive partition

Distributed Clustered Architecture

Distributed Architecture will have the following components:
  • Heavy Forwarder – Collects the data and forwards it to Indexers.

  • Indexers – Stores the data and performs a search on that data (3 or more)

  • Search Head – Users will interact here. The search head will trigger the search on indexers to fetch the data.

  • Licensing Server

  • Master Cluster Node

  • Deployment Server

Search Head hardware requirements

  • Intel 64-bit chip architecture

  • 16 CPU cores at 2Ghz or greater speed per core

  • 12GB RAM

  • A 1Gb Ethernet NIC

  • A 64-bit Linux or Windows distribution

Indexer requirements

  • Intel 64-bit chip architecture

  • 12 CPU cores at 2GHz or greater per core

  • 12GB RAM

  • 800 average IOPS as a minimum for the disk subsystem. For details, see the topic Disk subsystem. Refer Calculate Storage Requirement see how much storage will your deployment need

  • A 1Gb Ethernet NIC

  • A 64-bit Linux or Windows distribution

Heavy Forwarder requirements

  • Intel 64-bit chip architecture

  • 12 CPU cores at 2Ghz or greater speed per core.

  • 12GB RAM

  • A 1Gb Ethernet NIC

  • A 64-bit Linux or Windows distribution

Deployment/Licensing/Cluster Master requirements

  • Intel 64-bit chip architecture

  • 12 CPU cores at 2GHz or greater per core

  • 12GB RAM

  • A 1Gb Ethernet NIC

  • A 64-bit Linux or Windows distribution

View Reference Here

Calculate Storage Requirements

Splunk will compress the data that you are ingesting. At a very high-level, Splunk’s compressed data to almost half the size, so for your standalone environment, you can calculate storage requirements with the below equation.

( Daily average indexing rate ) x ( retention policy in days ) x 1/2

For or your clustered environment, you can calculate storage requirements for each indexer with the below equation.

((( Daily average indexing rate ) x ( retention policy in days ) x 1/2) x replication factor)) / No. of Indexers)
View Reference Here

Written by Usama Houlila.

Any questions, comments, or feedback are appreciated! Leave a comment or send me an email to uhoulila@newtheme.jlizardo.com for any questions you might have.

If you wish to learn more, click the button below to schedule a free consultation with Usama Houlila.

The 2020 Magic Quadrant for SIEM

Mar 5, 2020 by Sam Taylor

For the seventh time running, Splunk was named a “Leader” in Gartner’s 2020 Magic Quadrant (MQ) for Security Information and Event Management (SIEM). In the report, Splunk was recognized for the highest overall “Ability to Execute.”

Thousands of organizations around the world use Splunk as their SIEM for security monitoring, advanced threat detection, incident investigation and forensics, incident response, SOC automation and a wide range of security analytics and operations use cases.

Download your complimentary copy of the report to find out why.

Yealink Releases New T5 Business Phone Series

Feb 24, 2020 by Sam Taylor

The Yealink T5 Business Phone Series – Redefining Next-Gen Personal Collaboration Experience

Yealink, the global leading provider of enterprise communication and collaboration solutions, recently announced the release of the new T5 Business Phone Series and VP59 Flagship Smart Video Phone. Being responsive to changes and demands in the marketplace, Yealink has designed and developed its novel T5 Series, the most advanced IP desktop phone portfolio in the industry. With the leading technology, the multifunctional T5 Business Phone Series provides the best personalized collaboration experience and great flexibility to accommodate the needs of the market.

In T5 Business Phone Series, seven phone models are introduced to cover different demands. Ergonomic design with larger LCD displays, the Yealink T5 Business Phone Series is specially developed for users to optimize visual experience, by utilizing the fully adjustable HD screen based on varied lightings, heights and sitting positions. This flexible function enables users to always maintain the best angle of view.

With the strong support of exclusive Yealink Acoustic Shield technology, a virtual voice “shield” is embedded in each model of T5 Business Phone Series.  Yealink Acoustic Shield technology uses multiple microphones to create the virtual “shield” between the speaker and the outside sound source. Once enabled, it intelligently blocks or mutes sounds from outside the “shield” so that the person on the other end hears you only and follows you clearly. This technology dramatically reduces frustration and improves productivity.

Featuring the advanced built-in Bluetooth and Wi-Fi, the high technology in the Yealink T5 Business Phone Series creates the industry-leading connectivity and scalability for its users to explore.  T5 Series effortlessly supports wireless communication and connection through wireless headsets and mobile phones in synch. Additionally, it is ready for seamless switching of call between desktop phone and cordless DECT headset via a corded-cordless phone configuration. 

The Yealink T5 Business Phone Series is redefining Next-Gen personal collaboration experience. The value of a desktop phone is redefined.  More possibilities to discover, to explore and to redefine.

About Yealink

Founded in 2001, Yealink (Stock Code: 300628) is a leading global provider of enterprise communication and collaboration solutions, offering video conferencing service to worldwide enterprises. Focusing on research and development, Yealink also insists on innovation and creation. With the outstanding technical patents of cloud computing, audio, video and image processing technology, Yealink has built up a panoramic collaboration solution of audio and video conferencing by merging its cloud services with a series of endpoints products. As one of the best providers in more than 140 countries and regions including the US, the UK and Australia, Yealink ranks No.1 in the global market share of SIP phone shipments (Global IP Desktop Phone Growth Excellence Leadership Award Report, Frost & Sullivan, 2018).

For more information, please visit: www.yealink.com.

CVE-2019-19781 – Vulnerability in Citrix Application Delivery Controller

Feb 11, 2020 by Sam Taylor

Description of Problem

A vulnerability has been identified in Citrix Application Delivery Controller (ADC) formerly known as NetScaler ADC and Citrix Gateway formerly known as NetScaler Gateway that, if exploited, could allow an unauthenticated attacker to perform arbitrary code execution.

The scope of this vulnerability includes Citrix ADC and Citrix Gateway Virtual Appliances (VPX) hosted on any of Citrix Hypervisor (formerly XenServer), ESX, Hyper-V, KVM, Azure, AWS, GCP or on a Citrix ADC Service Delivery Appliance (SDX).

Further investigation by Citrix has shown that this issue also affects certain deployments of Citrix SD-WAN, specifically Citrix SD-WAN WANOP edition. Citrix SD-WAN WANOP edition packages Citrix ADC as a load balancer thus resulting in the affected status.

The vulnerability has been assigned the following CVE number:

• CVE-2019-19781 : Vulnerability in Citrix Application Delivery Controller, Citrix Gateway and Citrix SD-WAN WANOP appliance leading to arbitrary code execution

The vulnerability affects the following supported product versions on all supported platforms:

• Citrix ADC and Citrix Gateway version 13.0 all supported builds before 13.0.47.24

• NetScaler ADC and NetScaler Gateway version 12.1 all supported builds before 12.1.55.18

• NetScaler ADC and NetScaler Gateway version 12.0 all supported builds before 12.0.63.13

• NetScaler ADC and NetScaler Gateway version 11.1 all supported builds before 11.1.63.15

• NetScaler ADC and NetScaler Gateway version 10.5 all supported builds before 10.5.70.12

• Citrix SD-WAN WANOP appliance models 4000-WO, 4100-WO, 5000-WO, and 5100-WO all supported software release builds before 10.2.6b and 11.0.3b

What Customers Should Do

Exploits of this issue on unmitigated appliances have been observed in the wild. Citrix strongly urges affected customers to immediately upgrade to a fixed build OR apply the provided mitigation which applies equally to Citrix ADC, Citrix Gateway and Citrix SD-WAN WANOP deployments. Customers who have chosen to immediately apply the mitigation should then upgrade all of their vulnerable appliances to a fixed build of the appliance at their earliest schedule. Subscribe to bulletin alerts at https://support.citrix.com/user/alerts to be notified when the new fixes are available.

The following knowledge base article contains the steps to deploy a responder policy to mitigate the issue in the interim until the system has been updated to a fixed build: CTX267679 – Mitigation steps for CVE-2019-19781

Upon application of the mitigation steps, customers may then verify correctness using the tool published here: CTX269180 – CVE-2019-19781 – Verification Tool

In Citrix ADC and Citrix Gateway Release “12.1 build 50.28”, an issue exists that affects responder and rewrite policies causing them not to process the packets that matched policy rules. This issue was resolved in “12.1 build 50.28/31” after which the mitigation steps, if applied, will be effective.  However, Citrix recommends that customers using these builds now update to “12.1 build 55.18”, or later, where CVE-2019-19781 issue is already addressed.

Customers on “12.1 build 50.28” who wish to defer updating to “12.1 build 55.18” or later should choose one from the following two options for the mitigation steps to function as intended:

1. Update to the refreshed “12.1 build 50.28/50.31” or later and apply the mitigation steps, OR

2. Apply the mitigation steps towards protecting the management interface as published in CTX267679. This will mitigate attacks, not just on the management interface but on ALL interfaces including Gateway and AAA virtual IPs

Fixed builds have been released across all supported versions of Citrix ADC and Citrix Gateway. Fixed builds have also been released for Citrix SD-WAN WANOP for the applicable appliance models. Citrix strongly recommends that customers install these updates at their earliest schedule. The fixed builds can be downloaded from https://www.citrix.com/downloads/citrix-adc/ and https://www.citrix.com/downloads/citrix-gateway/ and https://www.citrix.com/downloads/citrix-sd-wan/


Customers who have upgraded to fixed builds do not need to retain the mitigation described in CTX267679.


Fix Timelines

Citrix has released fixes in the form of refresh builds across all supported versions of Citrix ADC, Citrix Gateway, and applicable appliance models of Citrix SD-WAN WANOP. Please refer to the table below for the release dates.


Acknowledgements

Citrix thanks Mikhail Klyuchnikov of Positive Technologies, and Gianlorenzo Cipparrone and Miguel Gonzalez of Paddy Power Betfair plc for working with us to protect Citrix customers.

What Citrix Is Doing

Citrix is notifying customers and channel partners about this potential security issue. This article is also available from the Citrix Knowledge Center at  http://support.citrix.com/.

Obtaining Support on This Issue

If you require technical assistance with this issue, please contact Citrix Technical Support. Contact details for Citrix Technical Support are available at  https://www.citrix.com/support/open-a-support-case.html

Reporting Security Vulnerabilities

Citrix welcomes input regarding the security of its products and considers any and all potential vulnerabilities seriously. For guidance on how to report security-related issues to Citrix, please see the following document: CTX081743 – Reporting Security Issues to Citrix

Changelog

Splunk 2020 Predictions

Jan 7, 2020 by Sam Taylor

Around the turn of each new year, we start to see predictions issued from media experts, analysts and key players in various industries. I love this stuff, particularly predictions around technology, which is driving so much change in our work and personal lives. I know there’s sometimes a temptation to see these predictions as Christmas catalogs of the new toys that will be coming, but I think a better way to view them, especially as a leader in a tech company, is as guides for professional development. Not a catalog, but a curriculum.

We’re undergoing constant transformation — at Splunk, we’re generally tackling several transformations at a time — but too often, organizations view transformation as something external: upgrading infrastructure or shifting to the cloud, installing a new ERP or CRM tool. Sprinkling in some magic AI dust. Or, like a new set of clothes: We’re all dressed up, but still the same people underneath. 

I think that misses a key point of transformation; regardless of what tools or technology is involved, a “transformation” doesn’t just change your toolset. It changes the how, and sometimes the why, of your business. It transforms how you operate. It transforms you.

Splunk’s Look at the Year(s) Ahead

That’s what came to mind as I was reading Splunk’s new 2020 Predictions report. This year’s edition balances exciting opportunities with uncomfortable warnings, both of which are necessary for any look into the future.

Filed under “Can’t wait for that”: 

  • 5G is probably the most exciting change, and one that will affect many organizations soonest. As the 5G rollouts begin (expect it to be slow and patchy at first), we’ll start to see new devices, new efficiencies and entirely new business models emerge. 
  • Augmented and virtual reality have largely been the domain of the gaming world. However, meaningful and transformative business applications are beginning to take off in medical and industrial settings, as well as in retail. The possibilities for better, more accessible medical care, safer and more reliable industrial operations and currently unimagined retail experiences are spine-tingling. As exciting as the gaming implications are, I think that we’ll see much more impact from the use of AR/VR in business.
  • Natural language processing is making it easier to apply artificial intelligence to everything from financial risk to the talent recruitment process. As with most technologies, the trick here is in carefully considered application of these advances. 

On the “Must watch out for that” side:

  • Deepfakes are a disturbing development that threaten new levels of fake news, and also challenge CISOs in the fight against social engineering attacks. It’s one thing to be alert to suspicious emails. But when you’re confident that you recognize the voice on the phone or the image in a video, it adds a whole new layer of complexity and misdirection.
  • Infrastructure attacks: Coming into an election year, there’s an awareness of the dangers of hacking and manipulation, but the vulnerability of critical infrastructure is another issue, one that ransomware attacks only begin to illustrate.

Tools exist to mitigate these threats, from the data-driven technologies that spot digital manipulations or trace the bot armies behind coordinated disinformation attacks to threat intelligence tools like the MITRE ATT&CK framework, which is being adopted by SOCs and security vendors alike. It’s a great example of the power of data and sharing information to improve security for all.

Change With the Times

As a leader trying to drive Splunk forward, I have to look at what’s coming and think, “How will this transform my team? How will we have to change to be successful?” I encourage everyone to think about how the coming technologies will change our lives — and to optimize for likely futures. Business leaders will need greater data literacy and an ability to talk to, and lead, technical team members. IT leaders will continue to need business and communication skills as they procure and manage more technology than they build themselves. We need to learn to manage complex tech tools, rather than be mystified by them, because the human interface will remain crucial. 

There are still some leaders who prefer to “trust their gut” rather than be “data-driven.” I always think that this is a false dichotomy. To ignore the evidence of data is foolish, but data generally only informs decisions — it doesn’t usually make them. An algorithm can mine inhuman amounts of data and find patterns. Software can extract that insight and render an elegant, comprehensible visual. The ability to ask the right questions upfront, and decide how to act once the insights surface, will remain human talents. It’s the combination of instinct and data together that will continue to drive the best decisions.

This year’s Splunk Predictions offer several great ways to assess how the future is changing and to inspire thought on how we can change our organizations and ourselves to thrive.

3CX Phone System on Campus

Dec 23, 2019 by Sam Taylor

Higher Learning at a Lower Cost​

Universities are places where ideas can be communicated freely. What better way to do this, than through a unified communications system like 3CX. As the central communications system on-campus, 3CX offers multiple opportunities to encourage and facilitate learning. It can connect staff members and students with benefits for everyone, including free audio/video calls, low-cost external calls, access to all areas, integrations with other used systems, and more. Let’s examine this use case in more detail.

Affordable Communication on a Shoe-string Budget​

3CX is the ideal tool for universities that require all the advanced features of a unified communication system, without the hefty price tag. Apart from a PBX server, 3CX requires no additional hardware to be installed, making it easily accessible to your staff. The only requirement is a PC with a modern web browser. This simplifies administration, drastically reduces support requests and is a more cost-effective solution overall. What’s more, 3CX provides built-in support for a multitude of IP phones and SIP devices, making it easy to choose a desk phone or SIP device that suits everyone’s budget.

Keep in Contact, at the Lecture Theatre, Dorm or While Roaming

Add the 3CX Android and iOS apps to the mix, and your staff can talk, chat and access a university-wide shared phonebook/directory from their smartphones – wherever they may be. When calling on the move, the app reconnects calls automatically through available WiFi or 4G networks. They can also use Chat to exchange messages and documents while at the campus or anywhere else. 3CX can really empower you to do more with your devices!

Extend Your Reach to Facilitate Teamwork

Universities can typically span multiple buildings and areas, which makes setting up difficult under a single communications solution. Not so with 3CX, as it can unify all your remote offices and dorms using bridges and SBCs (Session Border Controllers), to allow your personnel and students to communicate, irrespective of their location. Academic staff and students can also use WebMeeting at no extra cost, to join on-line video meetings for study groups, or webinar sessions with teaching assistants, lab technicians, and so on.

Never Alone. Integrate & Automate

Traditionally a phone system functions in isolation, with little or no ability to interface with other university systems and services. On the contrary, 3CX includes built-in integration options with Office 365, databases, CRMs and other network-enabled systems.

As a quick example, consider a 3CX script-based IVR (Interactive Voice Response) menu, that services students’ course enrollment requests. The student calls the IVR, enters the ID for the chosen course and 3CX will deliver the student’s telephone number and course selection to the university’s course management system. What’s more, by using the Call Flow Designer (CFD), you can create call flows to automate your procedures, from course billing to announcements via text-to-speech. And CFD does not require any programming knowledge!

Keep in Control of Access & Security

Universities need to maintain controlled and secure access to areas like offices, labs, and dorms. 3CX supports popular video door phone devices which can be used with 3CX. Through this, you can attend to visitors seeking entry, or even control activity and access to specific areas – doing away with employing costly security personnel. You can also use PA systems connected to 3CX, to perform announcements in university common areas, classrooms and halls.

No Master’s Degree Required to Administer

With 3CX, administrators have freedom of choice! Install with ease on LinuxWindowsRaspberry Pi and on popular cloud providers like Google CloudAzure, and AWS. Not only is it easy to install, but easy to manage too. Keep your data safe by securing and managing your backups, recordings and voicemails with flexible options, on local or remote storage (FTP, SSH and SMB). What’s more, administrators can use the built-in Instance Manager to remotely monitor, manage and update a Linux PBX.

In Conclusion​

Universities are by definition communities of teachers and scholars. 3CX bridges the communication gap between these communities facilitates learning and strengthens relationships. It is the perfect fit for organizations that value communication as the primary means of education. And it comes with an affordable price tag, to boot!

FROM THE TRENCHES: 3CX SECURITY

Jul 11, 2019 by Sam Taylor

This past month one of our clients experienced a security compromise with their phone system, where 3 extensions had their credentials swiped. Among the information taken was the remote phone login information, including username, extension and password for their 3CX phone system.

Our first tip off of the attack was the mass amount of international calls being made. We quickly realized that this was not your traditional voicemail attack, or SIP viscous scanner attack because the signature of it was different (more below). To alleviate the situation we immediately changed their login credentials, but to our surprise the attack happened again with the same extensions within minutes of us changing their configuration.

For those of you thinking that the issue can be related to a simple or easy username and password (extension number and a simple 7-digit password), that wouldn’t be the case here. It’s important to note that with 3CX version 15.5 and higher, the login credentials are randomized and do not include the extension id, which makes it a lot harder to guess or brute force attack.

We locked down International dialing while we investigated the issue, and our next target was the server’s operating system. We wasted hours sifting through the logs to see if there were any signs of attack, but absolutely none were present. We next checked the firewall and again saw no signs of attack– so how was this happening? How were they able to figure out the user ID and password so quickly and without triggering the built-in protections that 3CX has, like blacklisting IP addresses and preventing password guessing attempts?

Right back to square one, we needed more information. After contacting different contacts of the client, we found out that the three extensions were present at an International venue, which interestingly enough, was the target of all the International calls!!! Phew, finally a decent clue. Under the assumption of a rogue wireless access point present at the hotel, we asked them to switch to VPN before using their extension, which stopped any new authentication fields from being guessed  – – –

While we were able to get our client up and running again, there was something a bit more interesting going on here. The hackers were using a program to establish connections and then use those connections to allow people to dial an International country on the cheap (margins here are extraordinary). That program is using an identifier “user_agent” when establishing a connection to make the calls. If we filter for that, they will have to redo their programming before they can launch the attack again, which proved to be a quick and instantaneous end to this attack irrespective of source– even if they acquire the necessary credentials.

Here’s how I would deal with this next time, in 3CX you can follow the following steps:

Go to

  1. Settings
  2. Parameters

3. Filter for “user_agent”

4. Add the user agent used (The Signature) in the attack to either fields and restart services

Eg. The Signature (Ozeki, Gbomba, Mizuphone)