Category: CyberSecurity

The ABC’s of Splunk Part Four: Deployment Server
Aug 3, 2020 by Sam Taylor

Thank you for joining us for part four of our ABC’s of Splunk series. If you haven’t read our first three blogs, get caught up here! Part 1Part 2Part 3.

When I started working with Splunk, our installations were mostly small with less than 10 servers and the rest of the devices mainly involved switches, routers, and firewalls. In the current environments which we manage most installations have more than three hundred servers which are impossible to manage without some form of automation. As you manage your environment over time, one of the following scenarios will make you appreciate the deployment server:

  1. You need to update a TA (technology add-on) on some, if not all, of your Universal Forwarders.
  2. Your logging needs changed over time and now you need to collect more or less data from your Universal Forwarders.
  3. You’re in the middle of investigating a breach, and/or an attack, and need to quickly push a monitoring change to your entire environment. – How cool is that!

What is a Deployment Server?

A deployment server is an easy way to manage forwarders without logging into them directly and individually to make any changes. Forwarders are the Linux or Microsoft Windows servers that you are collecting logs from by installing the Splunk Universal Forwarder.

Deployment servers also provide a way to show you which server has which Apps and whether those servers are in a connected state or offline.

Please note that whether you use Splunk Cloud or on-prem, the Universal Forwarders are still your responsibility and I hope that this blog will provide you with some good insights.

Deployment Server Architecture:

The below image shows how a deployment architecture looks conceptually.

There are three core components of the deployment server architecture:

  1. Deployment Apps
    Splunk Apps that will be deployed to the forwarders.
  2. Deployment Client
    The forwarder instances on which Splunk Apps will be deployed.
  3. Server Classes
    A logical way to map between Apps and Deployment Clients.
    • You can have multiple Apps within a Server Class.
    • You can deploy multiple Server Classes on a single Deployment Client.
    • You can have the same Server Class deployed on multiple Clients.

How Deployment Server Works:

  1. Each deployment client periodically polls the deployment server, identifying itself.
  2. The deployment server determines the set of deployment Apps for the client based on which server classes the client belongs to.
  3. The deployment server gives the client the list of Apps that belong to it, along with the current checksums of the Apps.
  4. The client compares the App info from the deployment server with its own App info to determine whether there are any new or updated Apps that it needs to download.
  5. If there are new or updated Apps, the Deployment Client downloads them.
  6. Depending on the configuration for a given App, the client might restart itself before the App changes take effect.

Where to Configure the Deployment Server:

The recommendation is to use a dedicated machine for the Deployment Server. However, you can use the same machine for other management components like “License Master”, “SH Cluster Deployer” or “DMC”. Do not combine it with Cluster Master.

Configuration:

I started writing this in a loose format explaining the concepts but quickly realized that a step by step is a much easier method to digest the process

1. Create a Deployment Server

By default, a Splunk server install does not have the deployment server configured and if you were to go to the GUI and click on settings, forwarder management, you will get the following message.

To enable a deployment server, you start by installing any App in $SPLUNK_HOME/etc/deployment-apps directory. If you’re not sure how to do that, download any App that you want through the GUI on the server you want to configure  (see the example below)

and then using the Linux shell or Windows server Cut/Paste, mv the entire App directory that was created from $SPLUNK_HOME/etc/apps where it installs by default to $SPLUNK_HOME/etc/deployment-apps. See below:

Move 

/opt/splunk/etc/apps/Splunk_TA_windows$

To /opt/splunk/etc/deployment-apps/Splunk_TA_windows$

This will automatically allow your Splunk server to present you with the forwarder management interface

2. Manage Server Classes Apps and Clients

Next, you will need to add a server class. Go to Splunk UI > Forwarder Management > Server Class. Create a new server class from here.

Give it a name that is meaningful to you and your staff and go to Step 3

3. Point the Clients to this Deployment Server

You can either specify that in the GUI guided config when you install Splunk Universal Forwarder on a machine or by using the CLI post installation

Splunk set deploy-poll <IP_address/hostname>:

Where,

IP_Address – IP Address of Deployment Server

management_port – Management port of deployment server (default is 8089)

4. Whitelist the Clients on the Deployment Server

Go to any of the server classes you just created, click on edit clients.

For Client selection, you can choose the “Whitelist” and “Blacklist” parameters. You can write a comma-separated IP address list in the “Whitelist” box to select those Clients

5. Assign Apps to Server Classes:

Go to any of the server classes you just created, and click on edit Apps.

Click on the Apps you want to assign to the server class.

Once you add Apps and Clients to a Server Class, Splunk will start deploying the Apps to the listed Clients under that Server Class.

You will also see whether the server is connected and the last time it phoned home.

Note – Some Apps that you push require the Universal Forwarder to be restarted. If you want Splunk Forwarder to restart on update of any App, edit that App (using the GUI) and then select the checkbox “Restart on Deploy”.

Example:

You have a few AD servers, a few DNS servers and a few Linux servers with Universal Forwarders installed to get some fixed sets of data, and you have 4 separate Apps to collect Windows Performance data, DNS specific logs, Linux audit logs, and syslogs.

Now you want to collect Windows Performance logs from all the Windows servers which includes AD servers, and DNS servers. You would also like to collect syslog and audit logs from Linux servers.

Here is what your deployment server would look like:

  • Server Class – Windows
    • Apps – Windows_Performance
    • Deployment Client – All AD servers and All DNS servers
  • Server Class – DNS
    • Apps – DNS_Logs
    • Deployment Client – DNS servers
  • Server Class – Linux
    • Apps – linux_auditd, linux_syslog
    • Deployment Client – Linux servers
6. How to Verify Whether Forwarder is Sending Data or Not?

Go to the Search Head and search with the below search (Make sure you have rights to see internal indexes data):

index=_internal | dedup host | fields host | table host

Look in the list to see if your Forwarder’s hostname is in the list, if it is present that means the Forwarder is connected. If you are missing a host using the above command, you might have one of two problems:

  1. A networking and or firewall issue somewhere in between and or on the host.
  2. Need to redo step 3 and/or restart the Splunk process on that server.

If you are missing a particular index/source data then check inputs.conf configuration in the App that you pushed to that host.

Other Useful Content:

Protect content during App updates (A must-read to minimize the amount of work you have to do overtime managing your environment)

https://docs.splunk.com/Documentation/Splunk/8.0.5/Updating/Excludecontent

Example on the Documentation

https://docs.splunk.com/Documentation/Splunk/8.0.5/Updating/Extendedexampledeployseveralstandardforwarders

Written by Usama Houlila.

Any questions, comments, or feedback are appreciated! Leave a comment or send me an email to uhoulila@newtheme.jlizardo.com for any questions you might have.

The ABC’s of Splunk Part Three: Storage, Indexes, and Buckets

Jul 28, 2020 by Sam Taylor

In our previous two blogs, we discussed whether to build a clustered or single Splunk environment and how to properly secure a Splunk installation using a Splunk user.

Read our first blog here

Read our second blog here

For this blog, we will discuss the art of Managing Storage with indexes.conf

In my experience, it’s easy to create and start using a large Splunk environment, until you see storage on your Splunk indexers getting full. What would you do? You start reading about it and you get information about indexes and buckets but you really don’t know what those are. Let’s find out

What is an Index?

Indexes are a logical collection of data. On disk, index data is stored in different buckets

What are Buckets?

Buckets are sets of directories that contain  _raw data (logs), and indexes that point to the raw data organized by age 

Types of Buckets:

There are 4 types of buckets in the Splunk based on the Age of the data

  1. Hot Bucket
    1. Location – homePath (default – $SPLUNK_DB//db)
    2. Age – New events come to these buckets
    3. Searchable – Yes
  2. Warm Buckets
    1. Location – homePath (default – $SPLUNK_DB//db)
    2. Age – Hot buckets will be moved to Warm buckets based on multiple policies of Splunk
    3. Searchable – Yes
  1. Cold Bucket
    1. Location – coldPath (default – $SPLUNK_DB//cold)
    2. Age – warm buckets will be moved to Cold buckets based on multiple policies of Splunk
    3. Searchable – Yes
  1. Frozen Bucket (Archived)
    1. Location – coldToFrozenDir (default – $SPLUNK_DB//cold
    2. Age – Cold buckets can be optionally archived. Archived data are called to be Frozen buckets.
    3. Searchable – No
  1. Thawed Bucket Location
    1. Location – thawedPath (no default)
    2. Age – Splunk does not put any data here. This is the location where archived (frozen) data can be unarchived -we will be covering this topic at a later date
    3. Searchable – Yes
Manage Storage and Buckets

I always like to include the reference materials from which the blog is based upon and the link below has all the different parameters that can be altered whether they should or not. It’s a long read but necessary if you intend to become an expert on Splunk 

https://docs.splunk.com/Documentation/Splunk/8.0.5/Admin/Indexesconf

Continuing with the blog:

Index level settings
  • homePath
    • Path where hot and warm buckets live
    • Default – $SPLUNK_DB//db
    • MyView – As data in Warm and hot bucket are latest and that’s what mostly is being searched. Keep it in a faster storage to get better search performance.
  • coldPath
    • Path where cold buckets are stored
    • Default – $SPLUNK_DB//colddb
    • MyView – As Splunk will move data from the warm bucket to here, slower storage can be used as long as you don’t have searches that span long periods > 2 months
  • thawedPath
    • Path where you can unarchive the data when needed
    • Volume reference does not work with this parameter
    • Default – $SPLUNK_DB//thaweddb
  • maxTotalDataSizeMB
    • The maximum size of an index, in megabytes.
    • Default – 500000
    • MyView – When I started working with Splunk, I left this field as-is for all indexes. Later on, I realized that the decision was ill-advised because the total number of indexes multiplied by the individual size, far exceeded my allocated disk space. If you can estimate the data size in any way, do it at this stage and save yourself the headache 
  • repFactor = 0|auto
    • Valid only for indexer cluster peer nodes.
    • Determines whether an index gets replicated.
    • Default – 0
    • MyView – when creating indexes (on a cluster), set the repFactor = auto so that if you change your mind down the line and decide to increase your resiliency. You can simply edit from the GUI and the change will apply to all your indexes without making manual changes to each one 


And now for the main point of this blog: How do I control the size of the buckets in my tenancy?

Option 1: Control how buckets migrate between hot to warm to cold

Hot to Warm (Limiting Bucket’s Size)

  • maxDataSize = |auto|auto_high_volume
    • The maximum size, in megabytes, that a hot bucket can reach before splunk
    • Triggers a roll to warm.
    • auto – 750MB
    • auto_high_volume – 10GB
    • Default – auto
    • MyView – Do not change it.
  • maxHotSpanSecs
    • Upper bound of timespan of hot/warm buckets, in seconds. Maximum timespan of any bucket can have.
    • This is an advanced setting that should be set with care and understanding of the characteristics of your data.
    • Default – 7776000 (90 days)
    • MyView – Do not increase this value.
  • maxHotBuckets
    • Maximum number of hot buckets that can exist per index.
    • Default – 3
    • MyView – Do not change this.

Warm to Cold

  • homePath.maxDataSizeMB
    • Specifies the maximum size of ‘homePath’ (which contains hot and warm buckets).
    • If this size is exceeded, splunk moves buckets with the oldest value of latest time (for a given bucket) into the cold DB until homePath is below the maximum size.
    • If you set this setting to 0, or do not set it, splunk does not constrain the size of ‘homePath’.
    • Default – 0
  • maxWarmDBCount
    • The maximum number of warm buckets.
    • Default – 300
    • MyView – Set this parameter with care as the number of buckets is very arbitrary based on a number of factors.

Cold to Frozen

When to move the buckets?
  • frozenTimePeriodInSecs [Post this time, the data will be deleted]
    • The number of seconds after which indexed data rolls to frozen.
    • Default – 188697600 (6 years)
    • MyView – If you do not want to archive the data, set this parameter to time for which you want to keep your data. After that Splunk will delete the data.
  • coldPath.maxDataSizeMB
    • Specifies the maximum size of ‘coldPath’ (which contains cold buckets).
    • If this size is exceeded, splunk freezes buckets with the oldest value of the latest time (for a given bucket) until coldPath is below the maximum size.
    • If you set this setting to 0, or do not set it, splunk does not constrain the size of ‘coldPath’.
    • Default – 0
What to do when freezing the buckets?
  • Delete the data
    • Default setting for Splunk
  • Archive the data
    • Please note – If you archive the data, Splunk will not delete the data automatically, you have to do it manually.
    • coldToFrozenDir
      • Archive the data into some other directories
      • This data is not searchable
      • It cannot use volume reference.
    • coldToFrozenScript
      • Script that you can use to ask Splunk what to do to archive the data from cold storage
      • See indexes.conf.spec for more information

Option 2: Control the maximum volume size of your buckets

Volumes

There are only two important settings that you really need to care about.

  • path
    • Path on the disk
  • maxVolumeDataSizeMB
    • If set, this setting limits the total size of all databases that reside on this volume to the maximum size specified, in MB.  Note that this will act only on those indexes which reference this volume, not on the total size of the path set in the ‘path’ setting of this volume.
    • If the size is exceeded, splunk removes buckets with the oldest value of the latest time (for a given bucket) across all indexes in the volume, until the volume is below the maximum size. This is the trim operation. This can cause buckets to be chilled [moved to cold] directly from a hot DB, if those buckets happen to have the least value of latest-time (LT) across all indexes in the volume.
    • MyView – I would not recommend using this parameter if you are having multiple (small and large) indexes in the same volume because now, the size of the volume will decide when the data moves from the hot buckets to the cold buckets irrespective of how important and or fast you need it to be

The Scenario that led to this blog:

Issue

One of our clients has a clustered environment and the hot/warm paths were on SSD drives of limited size (1 TB per indexer) and the coldpath had a 3TB size per indexer. The ingestion rate was somewhere around 60 GB per day across 36+ indexes which resulted in the hot/warm volume to fill up before any normal migration process would occur. When we tried to research the problem and ask the experts, there was no consensus on the best method and I would summarize the answer as follows “It’s an art and different per environment. I.e. we don’t have any advice for you”

Resolution 

We initially started looking for an option to move data to cold storage when data reaches a certain age (time) limit. But there is no way to do that. (Reference – https://community.splunk.com/t5/Deployment-Architecture/How-to-move-the-data-to-colddb-after-30-days/m-p/508807#M17467)

So, then we had two options as mentioned in the Warm to Cold section.

  1. maxWarmDBCount
  2. homePath.maxDataSizeMB

The problem with the maxDataSizeMB setting is that it would impact all indexes which means that some are going to end up in the cold bucket although they are needed in the hot/warm bucket and are not taking space. So we went the warm bucket route because we knew that only three indexes seem to consume most of the storage.  We looked at those and found that they were containing 180+ warm buckets.

We reduced maxWarmDBCount to 40 for these large indexes only and the storage size for the hot and warm buckets normalized for the entire environment.

For our next blog, we will be discussing how to archive and unarchive data in Splunk


Written by Usama Houlila.

Any questions, comments, or feedback are appreciated! Leave a comment or send me an email to uhoulila@newtheme.jlizardo.com for any questions you might have.

If you wish to learn more, click the button below to schedule a free consultation with Usama Houlila.

The ABC’s of Splunk Part Two: How to Install Splunk on Linux

Jul 21, 2020 by Sam Taylor

 In the last blog, we discussed how to choose between a single or clustered environment. Read our first blog here!

Regardless of which one you choose, you must install Splunk using a user other than root to prevent the Splunk platform from being used in a security breach.

The following instructions have to be done in sequence:

Step 1: Create a Splunk user

We will first create a separate user for Splunk and add a group for that user.
groupadd splunk
useradd -d /opt/splunk -m -g splunk splunk


Step 2: Download and Extract Splunk

The easiest way to download Splunk on a Linux machine is with wget. To get the URL do the following:

  1. Go to https://www.splunk.com/en_us/download/splunk-enterprise.html
  2. Log in with your Splunk credential.
  3. Select to download the Linux .tgz file. This will download the latest version of Splunk. To download an older version click on the “Older Releases” link.
  4. Once you click download, it will start downloading Splunk on your browser. Stop downloading.
  5. On the newly opened page, you will see Link for useful tools from there select “Download via Command Line (wget)” to get the URL.
  6. Select and copy the full wget link.

Open a Linux ssh session and paste in /opt/ directory. This will download the Splunk tgz file.

Extract Splunk:

tar -xvzf

Step 3: Start Splunk

Make sure from this point onwards you always use Splunk user to do any activity in the backend related to Splunk.

Change ownership of the Splunk directory.
Chown -R splunk:splunk /opt/splunk

Change user to Splunk.
su splunk

Start Splunk
/opt/splunk/bin/splunk start –accept-license

It will ask you to enter the admin username and password.

Step 4: Enable Splunk boot start.

/opt/splunk/bin/splunk enable boot-start -user splunk

Step 5: Use Splunk

Open your browser and go to the URL below and you will be able to use Splunk.
http://<ip-or-host-of-your-linux-machine>:8000/

Use the username and password you entered in step-3 while starting Splunk.

Click here for a reference

Written by Usama Houlila.

Any questions, comments, or feedback are appreciated! Leave a comment or send me an email to uhoulila@newtheme.jlizardo.com for any questions you might have.

If you wish to learn more, click the button below to schedule a free consultation with Usama Houlila.

Beware “Phishy” Emails

Jun 18, 2020 by Sam Taylor

By Wassef Masri

When the accounting manager at a major retail US company received an email from HR regarding harassment training, he trustingly clicked on the link. Had he looked closer, he could’ve caught that the source was only a look-alike address. Consequently, he was spear-phished.

The hackers emailed all company clients and informed them of a banking account change. The emails were then deleted from the “sent” folder. By the time the scam was discovered a month later, $5.1 Million were stolen.

As in the previous crisis of 2008, cyber-crime is on the rise. This time however, hackers are higher in numbers and more refined in techniques. Notably, the emergence of malware-as-a-service offerings on the dark web is giving rise to a class of non-technical hackers who are better at marketing and social engineering skills.

Phishing emails are the most common attack vector and are often the first stage of a multi-stage attack. Most organizations today experience at least one attack a month.

What started as “simple” phishing that fakes banking emails has evolved into three types of attacks that increase in sophistication:

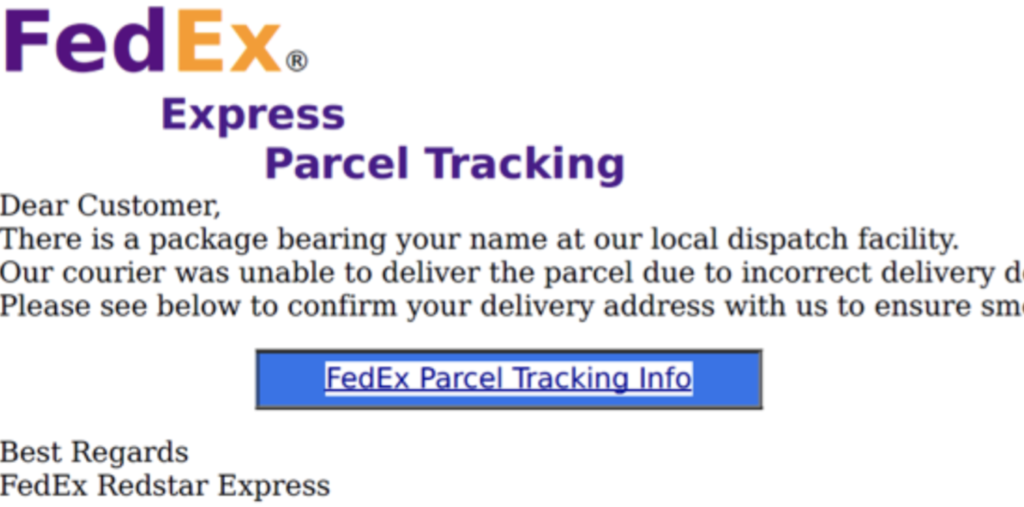
  • Mass phishing: Starts with a general address (e.g. “Dear customer”) and impersonates a known brand to steal personal information such as credit card credentials.
  • Spear phishing: More customized than mass phishing and addresses the target by his/her name, also through spoofed emails and sites.

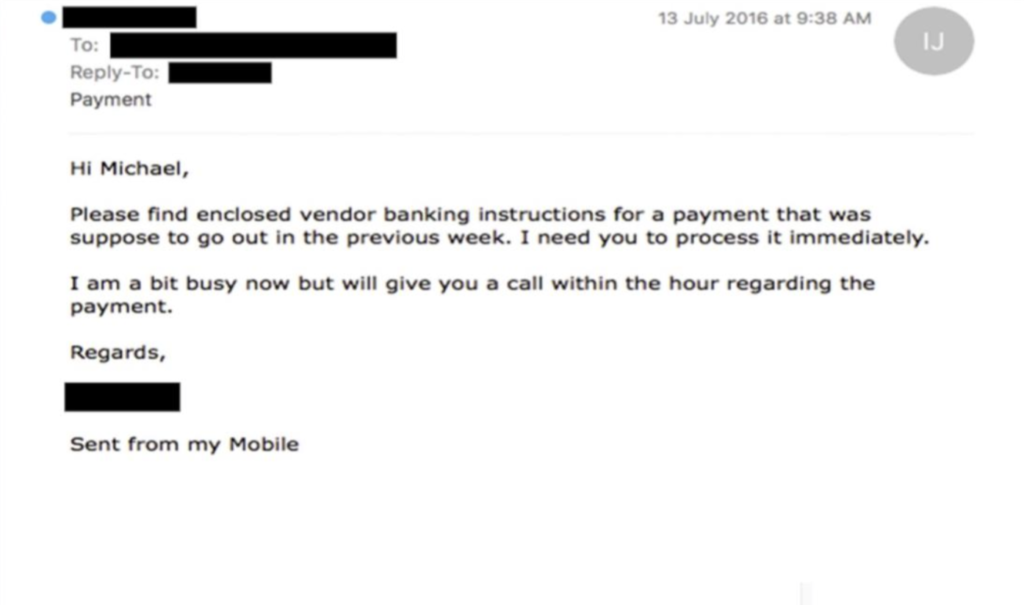
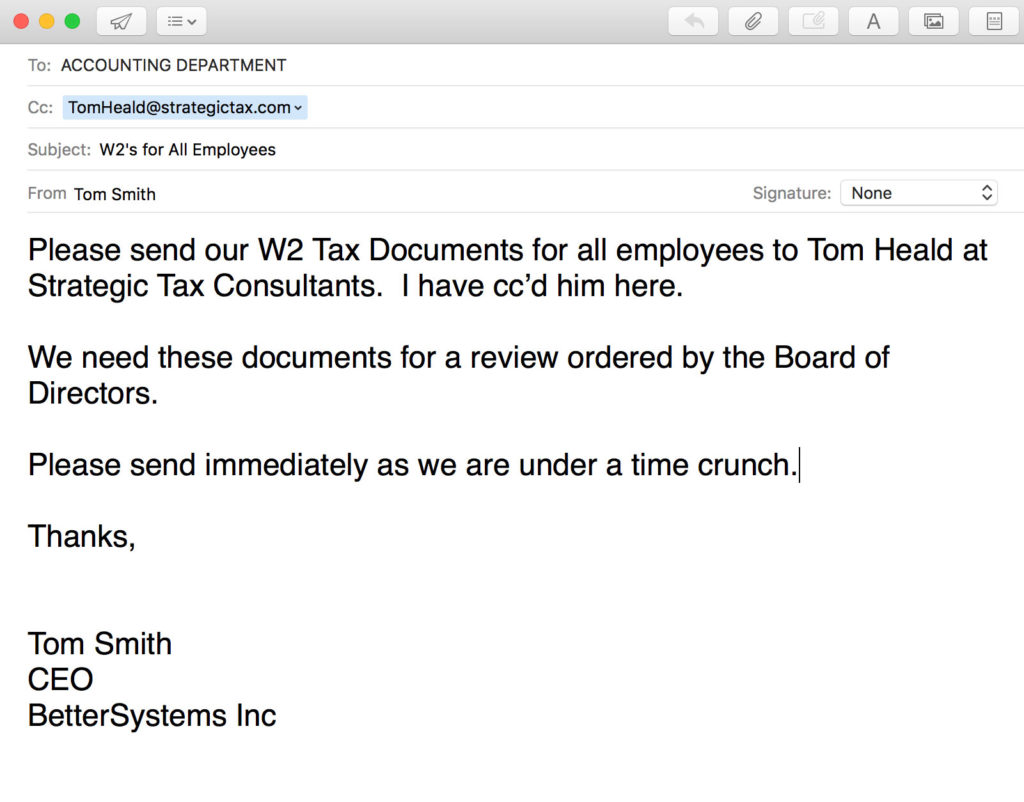
  • Business Email Compromise (BEC): Aka CEO fraud, is more advanced because it is sent from compromised email accounts, making them harder to uncover. They mostly target company funds.

How to Protect Against Phishing?

While there is no magical solution, best practices are multi-level combining advanced technologies with user education:

1. User awareness: Frequent testing campaigns and training.

2. Configuration of email system to highlight emails that originate from outside of the organization

3. Secure email gateway that blocks malicious emails or URL’s. It includes:

  • Anti-spam
  • IP reputation filtering
  • Sender authentication
  • Sandboxing
  • Malicious URL blocking

4. Endpoint security: The last line of defense; if the user does click a malicious link or attachment, a good endpoint solution has:

  • Deep learning: blocks new unknown threats
  • Anti-exploit: stops attackers from exploiting software vulnerabilities
  • Anti-ransomware: stops unauthorized encryption of company resources

It is not easy to justify extra spending especially with the decrease in IT budgets projected for 2020. It is essential however to have a clear strategy to prioritize action and to involve organization leadership in mitigating the pending threats.

Leave a comment or send an email to wmasri@newtheme.jlizardo.com for any questions you might have!

The 2020 Magic Quadrant for SIEM

Mar 5, 2020 by Sam Taylor

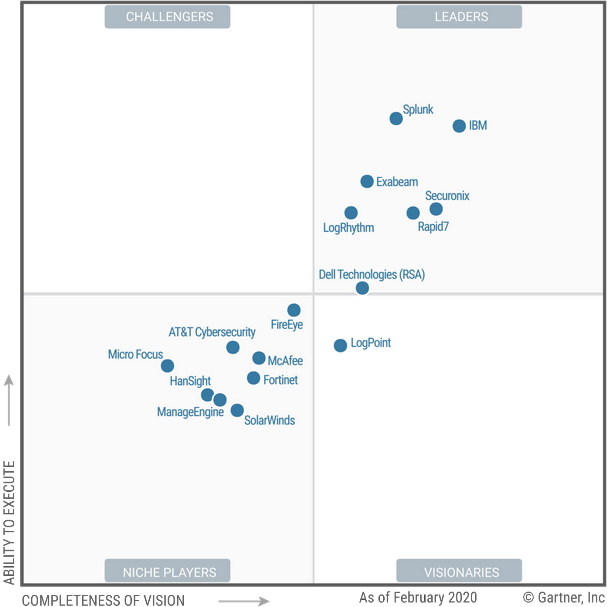
For the seventh time running, Splunk was named a “Leader” in Gartner’s 2020 Magic Quadrant (MQ) for Security Information and Event Management (SIEM). In the report, Splunk was recognized for the highest overall “Ability to Execute.”

Thousands of organizations around the world use Splunk as their SIEM for security monitoring, advanced threat detection, incident investigation and forensics, incident response, SOC automation and a wide range of security analytics and operations use cases.

Download your complimentary copy of the report to find out why.

CVE-2019-19781 – Vulnerability in Citrix Application Delivery Controller

Feb 11, 2020 by Sam Taylor

Description of Problem

A vulnerability has been identified in Citrix Application Delivery Controller (ADC) formerly known as NetScaler ADC and Citrix Gateway formerly known as NetScaler Gateway that, if exploited, could allow an unauthenticated attacker to perform arbitrary code execution.

The scope of this vulnerability includes Citrix ADC and Citrix Gateway Virtual Appliances (VPX) hosted on any of Citrix Hypervisor (formerly XenServer), ESX, Hyper-V, KVM, Azure, AWS, GCP or on a Citrix ADC Service Delivery Appliance (SDX).

Further investigation by Citrix has shown that this issue also affects certain deployments of Citrix SD-WAN, specifically Citrix SD-WAN WANOP edition. Citrix SD-WAN WANOP edition packages Citrix ADC as a load balancer thus resulting in the affected status.

The vulnerability has been assigned the following CVE number:

• CVE-2019-19781 : Vulnerability in Citrix Application Delivery Controller, Citrix Gateway and Citrix SD-WAN WANOP appliance leading to arbitrary code execution

The vulnerability affects the following supported product versions on all supported platforms:

• Citrix ADC and Citrix Gateway version 13.0 all supported builds before 13.0.47.24

• NetScaler ADC and NetScaler Gateway version 12.1 all supported builds before 12.1.55.18

• NetScaler ADC and NetScaler Gateway version 12.0 all supported builds before 12.0.63.13

• NetScaler ADC and NetScaler Gateway version 11.1 all supported builds before 11.1.63.15

• NetScaler ADC and NetScaler Gateway version 10.5 all supported builds before 10.5.70.12

• Citrix SD-WAN WANOP appliance models 4000-WO, 4100-WO, 5000-WO, and 5100-WO all supported software release builds before 10.2.6b and 11.0.3b

What Customers Should Do

Exploits of this issue on unmitigated appliances have been observed in the wild. Citrix strongly urges affected customers to immediately upgrade to a fixed build OR apply the provided mitigation which applies equally to Citrix ADC, Citrix Gateway and Citrix SD-WAN WANOP deployments. Customers who have chosen to immediately apply the mitigation should then upgrade all of their vulnerable appliances to a fixed build of the appliance at their earliest schedule. Subscribe to bulletin alerts at https://support.citrix.com/user/alerts to be notified when the new fixes are available.

The following knowledge base article contains the steps to deploy a responder policy to mitigate the issue in the interim until the system has been updated to a fixed build: CTX267679 – Mitigation steps for CVE-2019-19781

Upon application of the mitigation steps, customers may then verify correctness using the tool published here: CTX269180 – CVE-2019-19781 – Verification Tool

In Citrix ADC and Citrix Gateway Release “12.1 build 50.28”, an issue exists that affects responder and rewrite policies causing them not to process the packets that matched policy rules. This issue was resolved in “12.1 build 50.28/31” after which the mitigation steps, if applied, will be effective.  However, Citrix recommends that customers using these builds now update to “12.1 build 55.18”, or later, where CVE-2019-19781 issue is already addressed.

Customers on “12.1 build 50.28” who wish to defer updating to “12.1 build 55.18” or later should choose one from the following two options for the mitigation steps to function as intended:

1. Update to the refreshed “12.1 build 50.28/50.31” or later and apply the mitigation steps, OR

2. Apply the mitigation steps towards protecting the management interface as published in CTX267679. This will mitigate attacks, not just on the management interface but on ALL interfaces including Gateway and AAA virtual IPs

Fixed builds have been released across all supported versions of Citrix ADC and Citrix Gateway. Fixed builds have also been released for Citrix SD-WAN WANOP for the applicable appliance models. Citrix strongly recommends that customers install these updates at their earliest schedule. The fixed builds can be downloaded from https://www.citrix.com/downloads/citrix-adc/ and https://www.citrix.com/downloads/citrix-gateway/ and https://www.citrix.com/downloads/citrix-sd-wan/


Customers who have upgraded to fixed builds do not need to retain the mitigation described in CTX267679.


Fix Timelines

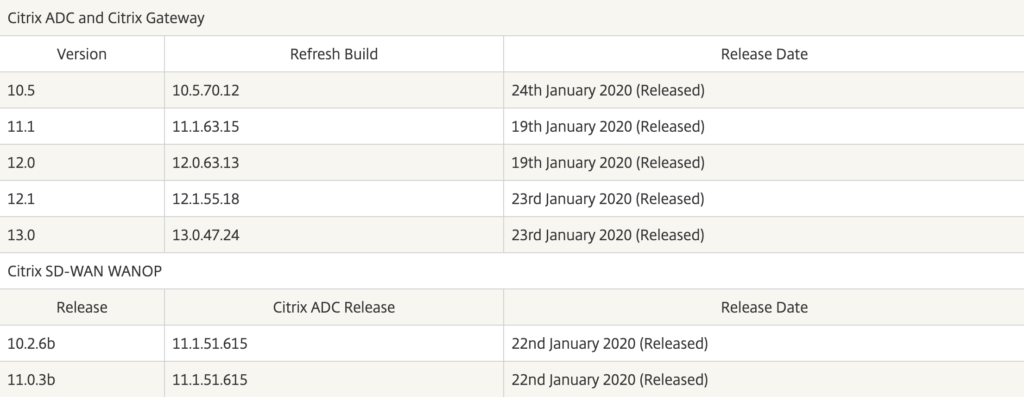
Citrix has released fixes in the form of refresh builds across all supported versions of Citrix ADC, Citrix Gateway, and applicable appliance models of Citrix SD-WAN WANOP. Please refer to the table below for the release dates.


Acknowledgements

Citrix thanks Mikhail Klyuchnikov of Positive Technologies, and Gianlorenzo Cipparrone and Miguel Gonzalez of Paddy Power Betfair plc for working with us to protect Citrix customers.

What Citrix Is Doing

Citrix is notifying customers and channel partners about this potential security issue. This article is also available from the Citrix Knowledge Center at  http://support.citrix.com/.

Obtaining Support on This Issue

If you require technical assistance with this issue, please contact Citrix Technical Support. Contact details for Citrix Technical Support are available at  https://www.citrix.com/support/open-a-support-case.html

Reporting Security Vulnerabilities

Citrix welcomes input regarding the security of its products and considers any and all potential vulnerabilities seriously. For guidance on how to report security-related issues to Citrix, please see the following document: CTX081743 – Reporting Security Issues to Citrix

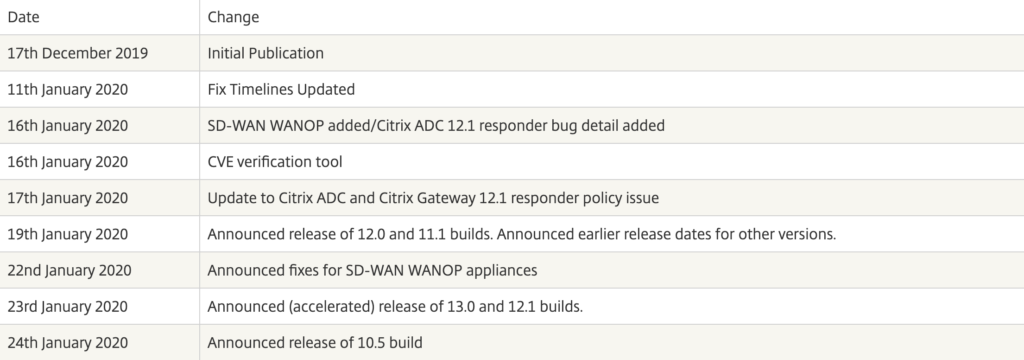
Changelog

COHESITY MSP SOLUTION VS RIVALS

Jul 11, 2019 by Sam Taylor

Cohesity vs. Rival Solution:

Comparison from a Business Continuity Perspective

The Business Continuity field is saturated with different solutions, all promising to the do the same thing- keep your business running smoothly and safely post-disaster. But how do you weed through the options to determine which solution is best, and what criteria should you use to do this?

The idea for this blog post came about during a recent visit to a newly acquired client, who was using one of the many solutions for Business Continuity. After asking about the service, our client realized that they had bought it based on affordability, but did not actually analyze the service – and whether it’s good enough for their business. Below, we’ll explore the differences between the above-mentioned solution and Cohesity’s MSP solution (which we currently use at CrossRealms) from technical, process, and financial perspectives. We hope this information can help you think more critically about what’s involved in achieving optimal Business Continuity/Disaster Recovery.

Technical & Process

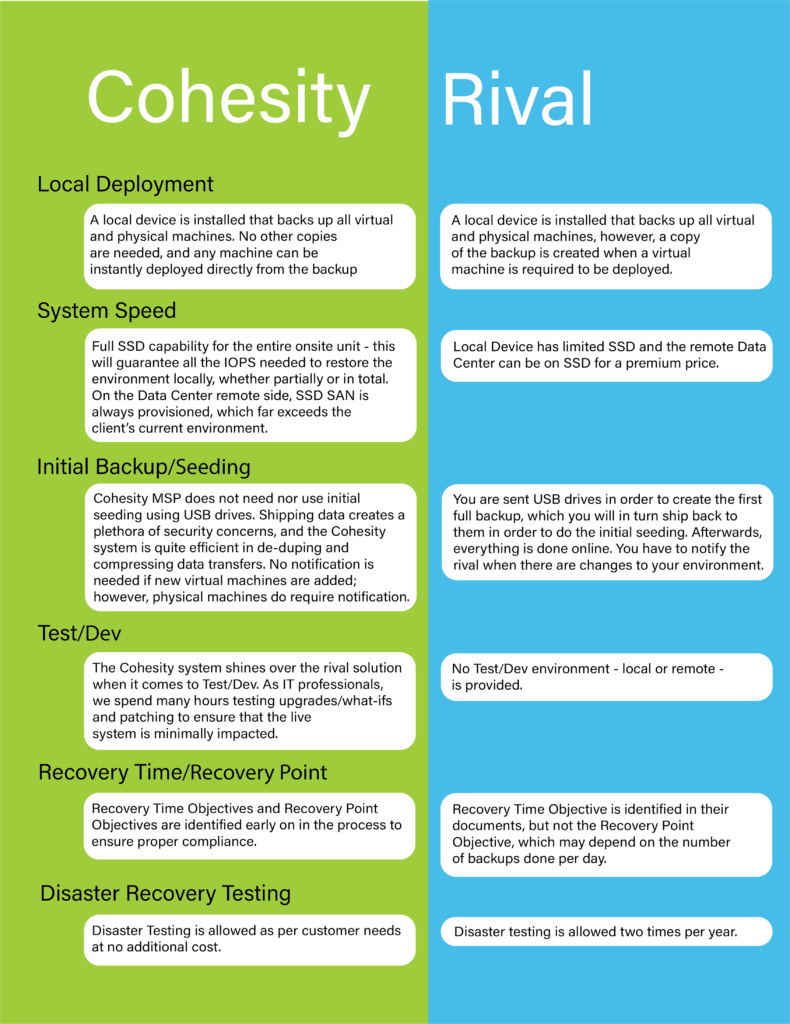
Let’s start with the functional differences between the rival and the Cohesity MSP solution. The following chart breaks it down:

Financial

The Cohesity pricing is around $250/TB per month, depending on the size of the backup and requirements, with a one-year minimum commitment. This includes unlimited machine licensing, cloud backup, and SSD local storage for extremely fast recovery. It also includes Tabletop exercises and other business functions necessary for a complete Business Continuity solution.

The rival solution pricing (depending on the reseller) is around $240/TB per month – including the local storage with limited SSD. This also includes unlimited machine licensing and file recovery. It does not include Tabletop exercises, local SSD, or remote connectivity to their data center by the users in case of catastrophic office failure.

Conclusion

Overall, Cohesity outshines competitors with regards to the initial backup/seeding and Test/Dev processes. While it is slightly more expensive, the extra cost is absolutely worth the added benefits.

We hope this post will start a conversation around what should be included or excluded from a Business Continuity plan, and what variables need to be considered when comparing different products. Please comment with any questions or insight – we’d love to hear your thoughts.

BUSINESS CONTINUITY IN THE FIELD: A SERIES OF CASE STUDIES BY CROSSREALMS

Jul 11, 2019 by Sam Taylor

Case Study #1: Rural Hospitals and New Technologies: Leading the Way in Business Continuity

The purpose of this series is to shed light onto the evolving nature of Business Continuity, across all industries. If you have an outdated plan, the likelihood of success in a real scenario is most certainly diminished. Many of our clients already have a plan in place, but as we start testing, we have to make changes or redesign the solution altogether. Sometimes the Business Continuity plan is perfect, but does not include changes that were made recently – such as new applications, new business lines/offices, etc.

In each scenario, the customer’s name will not be shared. However, their business and technical challenges as they relate to Business Continuity will be discussed in detail.

Introduction

This case study concerns a rural hospital in the Midwest United States. Rural hospitals face many challenges, mainly in the fact that they serve poorer communities with fewer reimbursements and a lower occupancy rate than their metropolitan competition. Despite this, the hospital was able to surmount these difficulties and achieve an infrastructure that is just as modern and on the leading edge as most major hospital systems.

Background

Our client needed to test their existing Disaster Recovery plan and develop a more comprehensive Business Continuity plan to ensure compliance and seamless healthcare delivery in case of an emergency. This particular client has one main hospital and a network of nine clinics and doctor’s offices.

The primary items of concern were:

  • Connectivity: How are the hospital and clinics interconnected, and what risks can lead to a short or long-term disruption?
  • Medical Services: Which of their current systems are crucial for them to continue to function, whether they are part of their current disaster recovery plan, and whether or not they have been tested.
  • Telecommunication Services: Phone system and patient scheduling.
  • Compliance: If the Disaster Recovery system becomes active, especially for an extended period of time, the Cyber Security risk will increase as more healthcare practitioners use the backup system, and, by default, expose it to items in the wild that might currently exist, but have never impacted the existing live system.

After a few days of audit, discussions, and discovery, the following were the results:

Connectivity: The entire hospital and all clinics were on a single Fiber Network which was the only one available in the area. Although there were other providers for Internet access, local fiber was only available from one provider.

Disaster Recovery Site: Their current Business Continuity solution had one of the clinics as a disaster recovery site. This would be disastrous in the event of a fiber network failure, as all locations would go down simultaneously.

Partner Tunnels: Many of their clinical functions required access to their partner networks, which is done through VPN tunnels. This was not provisioned in their current solution.

Medical Services: The primary EMR system was of great concern because their provider would say: “Yes, we are replicating the data and it’s 100% safe, but we cannot test it with you – because, if we do, we have to take the primary system down for a while.” Usually when we hear this, we start thinking “shitshows”. So, we dragged management into it and forced the vendor to run a test. The outcome was a failure. Yes, the data was replicated, and the system could be restored, but it could not be accessed by anyone. The primary reason was the fact that their system replicates and publishes successfully only if the redundant system is on the same network as the primary (an insane – and, sadly – common scenario). A solution to this problem would be to create an “Extended LAN” between the primary site and the backup site.

Telecommunication: The telecommunication system was not a known brand to us, and the manufacturer informed us that the redundancy built into the system only works if both the primary and secondary were connected to the same switch infrastructure.

Solution Proposed

CrossRealms proposed a hot site solution in which three copies of the data and virtual machines will exist: one on their production systems, one on their local network in the form of a Cohesity Virtual Appliance, and one at our Chicago/Vegas Data Centers. This solution allows for instantaneous recovery using the second copy if their local storage or virtual machines are affected. Cohesity’s Virtual Appliance software can publish the environment instantaneously, without having to restore the data to the production system.

The third copy will be used in the case of a major fiber outage or power failure, where their systems will become operational at either of our data centers. The firewall policies and VPN tunnels are preconfigured – including having a read-only copy of their Active Directory environment – which will provide up-to-the-minute replication of their authentication and authorization services.

The following are items still in progress:

  • LAN Extension for their EMR: We have created a LAN Extension to one of their clinics which will help in case of a hardware or power/cooling failure at their primary facility. However, the vendor has very specific hardware requirements, which will force the hospital to either purchase and collocate more hardware at our data center, or migrate their secondary equipment instead.
  • Telecom Service: They currently have ISDN backup for the system, which will work even in the case of a fiber outage; once the ISDN technology is phased out in the next three years, an alternative needs to be configured and tested. Currently there will be no redundancy in case of primary site failure, which is a risk that may have to be pushed to next year’s budget.

Lessons Learned

The following are our most important lessons learned through working with this client:

  • Bringing management on board to push and prod vendors to work with the Business Continuity Team is important. We spent months attempting to coordinate testing the EMR system with the vendor, and only when management got involved did that happen.
  • Testing the different scenarios based on the tabletop exercises exposed issues that we didn’t anticipate, such as the fact that their primary storage was Solid State. This meant the backup solution had to incorporate the same level of IOPS, whether local to them or at our data centers.
  • Run books and continuous practice runs were vital, as they are the only guarantee of an orderly, professional, and expedient restoration in a real disaster.

100,000+ MALICIOUS SITES REMOVED WITHIN LAST TEN MONTHS

Jul 11, 2019 by Sam Taylor

Amidst a news cycle rife with malware incidents and cyberattacks, there is one shining spot of hope: 100,000 malware sites have been reported and taken down within the last year.  

Abuse.ch, a non-profit cybersecurity organization, has spearheaded a malicious URL hunt known as the URLhaus intiative. First launched in March 2018, a small group of 265+ security professionals have been searching for sites that feature active malware campaigns. These reported sites are passed down to information security (infosec) communities, who work to blacklist or take down URL’s completely.

While abuse reports are rolling in, there has been slow action on the web hosting provider’s part. Once a provider has been reported to have a malicious site, they need to take action in removing or altering the site. Average times to remove the malware infected site has been reported to be 8 days, 10 hours, and 24 minutes– a generous time delay that allows the malware to infect even more end users.

Heodo is one of the most popular malwares used, a multi-faced strain that can be utilized as a downloader for a variety of other attacks, acting as a spam bot, banking trojan, or a credentials swiper.

While sites aren’t responding with a particular deftness, it is still quite a feat to gather all these malicious URL’s with the power of such a limited group of researchers.

FROM THE TRENCHES: 3CX SECURITY

Jul 11, 2019 by Sam Taylor

This past month one of our clients experienced a security compromise with their phone system, where 3 extensions had their credentials swiped. Among the information taken was the remote phone login information, including username, extension and password for their 3CX phone system.

Our first tip off of the attack was the mass amount of international calls being made. We quickly realized that this was not your traditional voicemail attack, or SIP viscous scanner attack because the signature of it was different (more below). To alleviate the situation we immediately changed their login credentials, but to our surprise the attack happened again with the same extensions within minutes of us changing their configuration.

For those of you thinking that the issue can be related to a simple or easy username and password (extension number and a simple 7-digit password), that wouldn’t be the case here. It’s important to note that with 3CX version 15.5 and higher, the login credentials are randomized and do not include the extension id, which makes it a lot harder to guess or brute force attack.

We locked down International dialing while we investigated the issue, and our next target was the server’s operating system. We wasted hours sifting through the logs to see if there were any signs of attack, but absolutely none were present. We next checked the firewall and again saw no signs of attack– so how was this happening? How were they able to figure out the user ID and password so quickly and without triggering the built-in protections that 3CX has, like blacklisting IP addresses and preventing password guessing attempts?

Right back to square one, we needed more information. After contacting different contacts of the client, we found out that the three extensions were present at an International venue, which interestingly enough, was the target of all the International calls!!! Phew, finally a decent clue. Under the assumption of a rogue wireless access point present at the hotel, we asked them to switch to VPN before using their extension, which stopped any new authentication fields from being guessed  – – –

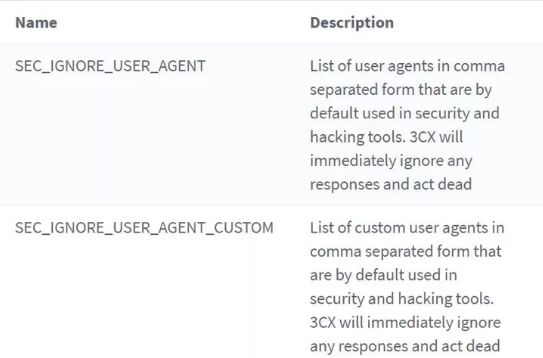
While we were able to get our client up and running again, there was something a bit more interesting going on here. The hackers were using a program to establish connections and then use those connections to allow people to dial an International country on the cheap (margins here are extraordinary). That program is using an identifier “user_agent” when establishing a connection to make the calls. If we filter for that, they will have to redo their programming before they can launch the attack again, which proved to be a quick and instantaneous end to this attack irrespective of source– even if they acquire the necessary credentials.

Here’s how I would deal with this next time, in 3CX you can follow the following steps:

Go to

  1. Settings
  2. Parameters

3. Filter for “user_agent”

4. Add the user agent used (The Signature) in the attack to either fields and restart services

Eg. The Signature (Ozeki, Gbomba, Mizuphone)